The first teaser trailer for World War Z was released the last week.
I spent some time the last year working on some of those zombies.
You can watch the HD trailer here.
Enjoy it!
The first teaser trailer for World War Z was released the last week.
I spent some time the last year working on some of those zombies.
You can watch the HD trailer here.
Enjoy it!
This is the first trailer for The Lone Ranger, one of my latest projects.
If you don’t know much about The Lone Ranger, I recommend you to visit the iTunes Store and download the original radio programs (podcasts) for free.
I’ve been working in Munich at Trixter on Iron Man 3.
The first spectacular trailer was released last week, enjoy it!
I was responsible for the textures of Iron Man for some of the most interesting shots of the trailer.
Now, I’m back in London working again at MPC.
Iron Man 3 trailer on Youtube.
Cheers!
When you work for a big VFX or animation studio you usually light your shots with different complex light rigs, often developed by highly talented people.
But when you are working at home or for small studios or doing freelance tasks or whatever else.. you need to simplify your techniques and tray to reach the best quality as you can.
For those reasons, I have to say that I’m switching from Mental Ray to V-Ray.
One of the features that I most love about V-Ray is the awesome dome light to create image based lighting setups.
Let me tell you a couple of thing which make that dome light so great.
Finally my Introduction Course to Texturing and Look-Development in VFX Projects is out.
At this moment the Spanish version is the only one available, but I’m working on the English version and it will be ready for you pretty soon.
Meanwhile you can check all the information here.
Thanks!
Quick and dirty RealFlow test.
Not a big deal, just a couple of frames of my chocolate animation.
…with a touch of salt&pepper.
Just a simple test here.
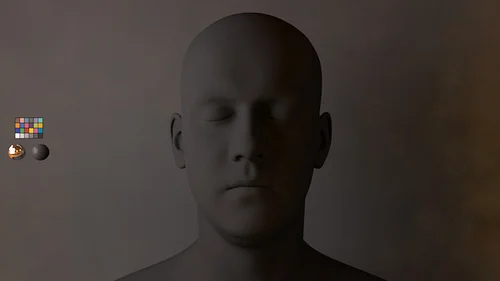
I wanted to create a strong portrait lighting for this male subject. I thought on Rembrandt Light, one of my favourite lighting set-up.
Rembrandt light is great, I love that kind of lighting specially when you are shooting portraits on exterior locations, but I prefer other lighting set-ups for studio shots.
So, I did a couple of touches to create a darkish environment on the Rembrandt lighting set-up for studio scenes and achieve a more strong and dramatic portrait.
Find below some test which I did and some lines about the construction of this set-up.
Big thanks to the guys of Infinite-Realities for provide this great model.
I used a big soft box created with a portal light controlled by Kelvin temperature.
Then, I created a huge sphere wrapping all the scene, with a 16bit grey to white gradient to help Final Gathering to add soft environment light.
I also create a strong rim light to separate a little bit the subject from the background.
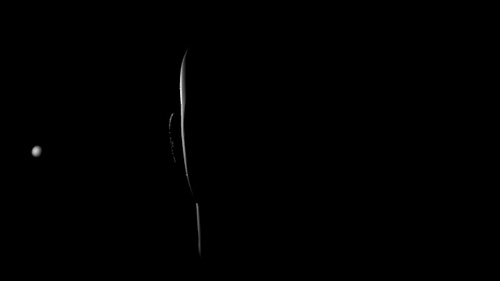
And finally to create more penumbra areas and strong feeling to the image, I put a light blocker close to the subject. With this basic geometry with a constant black shader the environment light created by FG is absorbed on the right side of the picture.
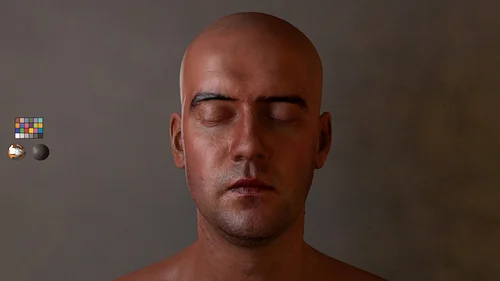
With this simple set-up my Rembrandt Light looks more dramatic, right?
Blocking.
Some environment lighting added.
Blocking the environment light using a black panel.
Testing displacement maps.
First test with SSS.
Some passes to play with. (environment light).
Main soft box.
Rim light.
Reflection.
Final render.
These are the key points of an introduction lecture which I gave about texturing for VFX film projects.
We used different assets on the class but this is the only one which is not copyrighted and I can show here.
I created this asset specifically for this course.
Summary
- Check the model.
- Render a checker scene.
- Decide about the quality needed for the textures. Is it a hero asset?
- UV mapping.
- Organization methods.
- How many UDIM’s?
- Photo Shoot.
- What kind of lighting do I need?
- Accessories. (Color checkers, tripod, polarized filters, angular base, etc).
- Bakes. (dirt maps, dust maps, UVs, etc).
- Grading reference images. Create presets.
- Clean reference images for projections.
- Create cameras and guides in Maya/Softimage for projections.
- Adapt graded and cleaned reference images for projection guides.
- Project in 3D software or Mari. (Mari should be faster).
- Work on the projections inside Mari. (We can use Photoshop, Mari or both of them. Even Nuke).
- Create a 16 bits sRGB colour textures.
- Test colour channel in the light rig.
- Create a 16 bits gray scale specular textures.
- Create a 16 bits gray scale bump textures.
- Create a 16 bits gray scale displacement textures.
- Create a 8 bits gray scale ISO textures.
- Look-Dev blocking.
- Import the light rig.
- Create a basic pass.
- Checker render (matte).
- Checker render (reflective).
- Create clusters.
- Block materials.
- Look-Dev primary.
- Set up diffuse.
- Set up specular and reflections.
- Balance materials.
- Look-Dev secondary.
- Set up bump.
- Set up displacement.
- Rebalance materials.
- Set up ISO’s.
- Look-Dev refinement.
- Rebalance materials if needed.
- Create material libraries.
- Render turntables.
Recently working with V-Ray I discovered that these are the render passes which I use more often.
Simple scene, simple asset, simple texture and shading and simple lighting, just to show my render passes and pre-compositing stuff.
RGB
GI
Direct lighting
Normals
Occlusion
Reflection
Snow
Specular
UVs
XYZ global position
Slapcomp
I was lucky enough to find this simple but effective script to import your Mari textures in to Maya in a really quick way.
It is a Python script created by Kushal Goenka.
Follow these instructions to install the script.
# Mari2Maya – PyMEL Script
# Written by Kushal Goenka ( Animation Maniac )
# kushalgoenka@gmail.com
# http://AnimationManiac.deviantART.com
# Description:
# This Script Automates the Process of Setting up given MARI Texture Patches
# into one Single Layered Texture in Maya.
# Setup:
# Copy Script to ‘\maya\2012-x64\scripts’ folder. ’2012-x64′ might by different.
# Source the Script. ( Script Editor > File > Source Script… )
# Call the Python Command: ‘Mari2Maya()’ (or add to Shelf)
# Requirements:
# Export textures from MARI with ‘$UDIM.extension’ at the end.
# For Example: $ENTITY_$CHANNEL_$UDIM.tif >> Castle07_color_1003.tif
# Instructions:
# 1. Drag Texture Files into Hypershade.
# 2. Drag Select all Imported Texture File Nodes in the Hypershade Work Area.
# 3. Run the Script. via ‘Mari2Maya()’ Let the Magic happen.
Surfing around I just discover this great site by Robert Nederhorst, plenty of really nice and usefull tools for Maya and Nuke.
Awesome stuff by Robert, thanks!
I found on Youtube these series of videos. They are simply amazing, if you have the chance take some time to watch them.
I did this video for all the people enrolled in my texturing and look-dev course.
In that course I use Mari for some texturing tasks and with this video I’m trying to give to the students a short introduction to Mari before starting the course.
The audio is only in Spanish but I will record the video in English soon.
Enjoy!
Here some assets which belong to my Texturing and Look-dev course, available soon.
I’m starting a new work with V-Ray 2.0 for Maya. I never worked before with this render engine, so first things first.
One of my first things is create a nice neutral light rig for testing shaders and textures. Setting up linear workflow is one of my priorities at this point.
Find below a quick way to set up this.
A walk through video about setting up linear workflow in Softimage, audio only in Spanish but it’s quite simple to follow watching the movie.
Finally the trailer debut for Tim Burton’s Dark Shadows is out!
I worked on this film as a texture artist here at MPC London.
The trailer looks terrific btw! Enjoy!